Google

26 October 2018

Azure Edition of E-mail Converter Released

E-mail Converter for Azure and SharePoint logotype I am happy to announce the release of our first Azure product, E-mail Converter for Azure and SharePoint, an add-in/app that automatically converts e-mails into SharePoint list items. The solution uses a Scheduler in Azure to manage the e-mail conversion time.

E-mail Converter for Outlook and SharePoint was first
E-mail Converter for Outlook and SharePoint icon The Outlook edition of E-mail Converter has been in the market since 2010, earlier with the name HelpDesk OSP. We changed the name, because it was too limiting. It turned out that organizations use this Outlook add-in for all kinds of conversion of e-mails into SharePoint list items, not only for support cases.

E-mail Converter for Outlook and SharePoint requires Microsoft Outlook to be installed on each PC. With the Outlook edition, you can not only create SharePoint list items by converting e-mails but also create new list items. E-mails can be converted either manually or automatically, but the conversion process stops when the user logs off.

E-mail Converter for Azure and SharePoint
Azure-icon The kalmstrom.com team has now developed an Azure edition of E-mail Converter also, as many organizations require e-mail conversion to be a non-stop automatic process. This has been requested by many of our E-mail Converter users as well.

With E-mail Converter for Azure and SharePoint, you can have e-mails converted into SharePoint list items automatically 24x7. The solution supports all Exchange Web Service e-mails like Office 365, Windows Live and Microsoft Exchange. You must have a Microsoft Azure account to use the solution, of course.


Features
Many features are the same in both editions of E-mail Converter:
  • add ticket URL to converted e-mails
  • monitor multiple mailbox folders
  • transfer attachments and inline images from e-mails to SharePoint list items on conversion
  • keep e-mails concerning the same issue in one thread
  • merge related list items into one
  • generate Excel reports from list data
Scheduler
Azure Scheduler icon When you install E-mail Converter for Azure and SharePoint, it deploys three resources: App Service plan, Scheduler Job Collection and App Service. The Scheduler Job Collection is used to manage the e-mail conversion frequency in any way you want. By default, e-mails are converted every 5 minutes.

We use a free plan for the App Service, as it doesn’t affect the functionality of E-mail Converter, but we use a Minimum subscription to the Scheduler, which is EUR 12 or USD 14 per month.

Monitor multiple folders of a mailbox
When you install E-mail Converter for the first time, you must log in using the credentials of the mailbox that you wish to monitor with E-mail Converter.

After logging in you only have add the mailbox folders that you want E-mail Converter to monitor. All e-mails in a folder added to the E-mail Converter will be automatically converted into list items in the SharePoint list you select. You can very well let E-mail Converter monitor several folders and distribute the e-mails to different SharePoint lists.

Trial and Subscription
kamlstrom.com Trial icon If you are looking for a solution that converts e-mails into SharePoint list items 24x7, I recommend that you try E-mail Converter for Azure and SharePoint. You can get the solution from the Azure Marketplace and evaluate it for 30 days. The demo above shows how to install and configure, E-mail Converter but in case you need assistance, our Support team is here to help you.

You can subscribe to E-mail Converter on a monthly or yearly basis. Our Sales department will be happy to assist you if you have any queries regarding the subscription.

By Dipti Francis
Executive Assistant
kalmstrom.com Business Solutions

18 October 2018

Re-use Flow to Merge Forms Data into SharePoint List

Microsoft Flow iconIn a new kalmstrom.com Tips article, I show how to re-use flows and how to create a flow that merges information from several SharePoint forms lists into one tasks list.

Common use case
Most companies have a department that handles a lot of different tasks for the rest of the organization. In the new Tips article, I have used this common organizational use case to show how a flow can merge data from different forms. I also demonstrate how to re-use a flow by first exporting it and then importing it and create a new flow from it.

My imaginary department manages delivery of flowers, desks or computers. I have built one form to handle all the flower orders, another for the desks and a third for the computers. As always when it comes to forms, there is a list behind it, and each time someone fills out the form, a new list item is created.

Easier ordering and handling
In this case the same people will fulfill all the orders, no matter what is being ordered. Having all data that users enter in the order forms transferred to the same SharePoint tasks list, means that the order handlers do not have to check in three places to find orders that all need to be tracked and managed in the same way.

For the users in the organization, it is easier to have three different order forms. They see one form especially for flowers, with only the relevant columns for flower orders, one for computers and one for desks.

Another benefit of using a flow like this, is that you don't have to create extra columns for all the different order needs. For example, you don't need to create a column in the tasks list to contain the ”Computer Size”. That info is fetched from the form and transferred into the Description of the task that is created.

Data from any online form
As I am a SharePoint nerd, I let my flow send data from order forms in a SharePoint site to a SharePoint tasks list. Similar flows can be used whenever people input data in an online form. It can be requests for a quote or survey results, and the services might be Excel Surveys or Microsoft Forms. Flow also supports multiple third party forms solutions that give input from users.

Export and import
The flow in my tutorial is used for three different forms, and these forms need one flow each. Instead of creating three flows, I only create the first flow from scratch. After testing that flow, I export it to my PC and import it from there as a new flow. Then I only have to change the applicable flow settings to get a second and third flow.


As I have mentioned earlier, I am working with a new book: SharePoint Flows from Scratch. Links to my Flow articles will be included in each chapter, but a book can of course give much more information in a more structured way.

By Peter Kalmström
CEO and Systems Designer
kalmstrom.com Business Solutions

15 October 2018

SharePoint Editions of Kanban Task Manager Updated

Kanban Task Manager for SharePoint logotype The SharePoint editions of Kanban Task Manager have been updated with a new view and the possibilities to add multiple responsibles on a single task and create checklist templates.

Kanban Task Manager helps a workgroup to collaborate on projects and tasks on a virtual kanban board in SharePoint or Outlook. For SharePoint we offer two editions: sandboxed solution and add-in. Kanban Task Manager has several features to manage the tasks efficiently:
  • Color code tasks or projects.
  • Drag and drop tasks between phases as work proceeds.
  • View tasks related to multiple projects on one kanban board.
  • Create checklists in complicated tasks.
  • Keep track of the work done with a time logging feature.
  • Generate Excel reports that show statistics on tasks management.

Updated version with enhanced feature
We always welcome enhancement suggestions from subscribers, and we try our best to add all the useful features that are requested. As Kanban Task Manager is one of our most popular products, users send us many ideas, and the features in the new versions are some of them.

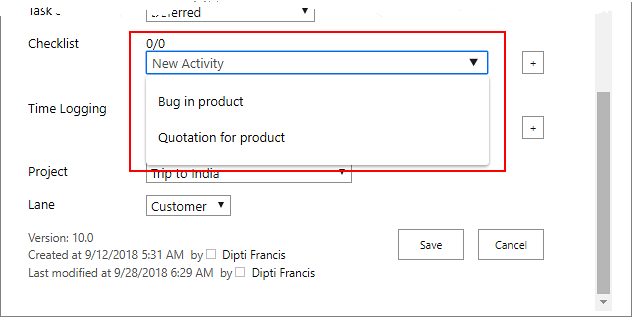
In a previous version of the Kanban Task Manager SharePoint editions we added a Checklist feature, that helps users to break down a complicated task into checklist steps. We have been upgrading this feature since then, so now you cannot only create checklists but also checklist templates.
Checklist-templates icon icon
Creating a new checklist for each task is inefficient when is the steps are the same for similar tasks. With the new feature, the Kanban Task Manager admin can create checklist templates for tasks where the same steps must be performed. Users can then select among the templates when they start working with a task or create a new checklist if none of the templates is suitable.

Multiple Responsibles
In organizations or teams it is common that more than one person works on a single task. Many users of Kanban Task Manager have therefore requested a possibility to assign a single task to multiple team members.

Multi-headed icon The updated Kanban Task Manager gives the possibility to add multiple responsibles to one task. In that case, the task card will have a multi-headed icon instead of the responsible person's photo.

Not Assigned view
There are various views in Kanban Task Manager where you can see the tasks on the basis of month, year, projects, responsible and their working status. This time a new view has been added to Kanban Task Manager: the ‘Not Assigned’ view.

The ‘Not Assigned’ view displays the unassigned tasks along with their descriptions. The view also shows all people who have been assigned tasks earlier, so you only have to drag and drop a task to assign it to a team member.

Upgrade and Support
kalmstrom.com Upgrade icon We always recommend our customers to use the latest version of our solutions, and upgrades are always included in our subscriptions. If your organization is a subscriber to a Kanban Task Manager SharePoint edition, you can download the updated version from the kalmstrom.com website.

Our Support team is always here to help you, if you need assistance in upgrading the solution.

Trial and Subscription
kamlstrom.com Trial icon You may download the full version of one of the Kanban Task Manager SharePoint editions from the kalmstrom.com website and evaluate it for 30 days without any obligations.

We have separate manuals for both the editions, that explains the solutions in detail. In addition to that, we also have video demonstrations by our CEO, Peter Kalmstrom, that can help you in understanding and evaluating the solution better.

In case you are new to Kanban Task Manager and need a skilled person to install and configure the solution, you may take advantage of our experts, who can do the work for you in a paid remote session.

Kanban Task Manager can be subscribed to on a monthly or yearly basis. You are always welcome to contact our Sales department in case you need assistance.

By Dipti Francis
Executive Assistant
kalmstrom.com Business Solutions
09 October 2018

Enhance SharePoint Search with Update Title Flow

SharePoint icon Data in Title columns is prioritized in the SharePoint Search, but in many library documents the titles are inaccurate or not filled out at all. In a new article in the kalmstrom.com Tips section, I describe how to create a flow that sets the title to the same as the file name. That will enhance the search results considerably, because document names are often descriptive and give relevant information on what the document contains.

When you make a search in SharePoint, the title hits are displayed on top. In SharePoint lists, the title is mandatory to fill out and is therefore never overlooked. In document libraries, however, the title is rather hidden, and it is a common problem that files are not given a title at all, or have non-descriptive, automatically set titles like "Document" that does not help the search at all.
Microsoft flow to set title in SharePoint library
In file systems, the titles don't have the same importance as it has in SharePoint, so files that are imported to SharePoint libraries often lack titles. Furthermore, the properties of such uploaded files do not open automatically. Instead, users must actively open the properties and add a title, and most users don't do that.

An easy way to solve the title problem is to let a flow set the value in the Title column to the same as in the Name column. The name is hopefully relevant, so this flow solves the problems with non-existing as well as irrelevant titles.


In the demo above, I have used the trigger "when an item is created or modified". This trigger is suitable to use in a library that already contains a lot of files that need to have a better title. In Edit mode, you can just add a dummy title and then drag it down the Title column of all files. They are then modified, and the flow will update the column and replace each dummy title with the value in the file's Name column.

Microsoft Flow icon For a new document library, I would instead recommend the trigger "when an item is created". Then the flow will set the title to the same as the name for all new files – but there will also be a possibility to change the title manually, to something else than the name value, without having the flow thwart your modification. The rest of the flow will be the same, and all steps are listed in the article about the update title flow.

If you prefer to use a workflow, I have a Tips article with demos on both a list workflow and a reusable workflow that set the title to the same as the file name in SharePoint document libraries.

By Peter Kalmström
CEO and Systems Designer
kalmstrom.com Business Solutions

05 October 2018

Folder HelpDesk for Outlook Released with New HTML views and features

Folder HelpDesk for Outlook logotype The kalmstrom.com issue tracking tool, Folder HelpDesk for Outlook has been updated. This time we have added new HTML views and given a possibility to show the e-mail received date on the ticket.

Folder HelpDesk for Outlook
Folder HelpDesk is an Outlook add-on that helps a workgroup collaborate on support cases or issues inside Outlook. With Folder HelpDesk users can convert e-mails into tickets, either manually or automatically. Along with converting e-mails into tickets, Folder HelpDesk gives users more possibilities to work efficiently with those tickets:
  • fetch tickets from an online form, manually or automatically
  • keep all the e-mails related to the same case in the same ticket
  • make a call from inside a ticket via any desktop calling application
  • reply to an e-mail from inside a ticket
  • generate Excel reports on ticket data for analysis and statistics

Improved Design of HTML views
Among the many Folder HelpDesk features is the possibility to visualize tickets in different HTML views: Kanban, Month, Year, Timeline Responsibles, Timeline Incidents, Timeline Callers and Incidents.

In this version, the design of the HTML views is improved and has been made more user friendly. Now you can reach all the HTML views from a single dropdown.

Folder HelpDesk - HTML views

New Feature
Folder HelpDesk gives various options to customize the ticket form, among them the option to automatically save non- existent values, assign default values for minutes worked and more.

Now a new feature has been added to the ticket form settings: ‘Show e-mail received time in the ticket’. Several subscribers have asked for this feature, so we know that it will be appreciated.

kalmstrom.com Upgrade icon Upgrade
Our subscriptions include support and upgrades. If your organization is a Folder HelpDesk subscriber, you are welcome to upgrade your installation. You may download the setup file from the kalmstrom.com website.

kamlstrom.com Trial icon Trial and Subscription
If your team wants to cooperate on support cases in Outlook, I would recommend that you try Folder HelpDesk. You may download the full version of Folder HelpDesk and try it for 30 days without any obligations. Do not hesitate to contact our Support team, if you need assistance during your evaluation period.

Folder HelpDesk can be subscribed to on a yearly or monthly basis. Our Sales department is here to help you if you have any queries regarding the subscription.

This update was just minor, but the kalmstrom.com developers are working on a major new version with several important enhancements. I will come back and tell you more about them in a later blog post.

By Dipti Francis
Executive Assistant
kalmstrom.com Business Solutions

03 October 2018

SharePoint Approvals in Multiple Steps

SharePoint iconIn earlier blog posts I have described different ways to manage approvals of documents in SharePoint libraries. As an example, I have used a Procedures library where new documents need to be approved by another person than the author.

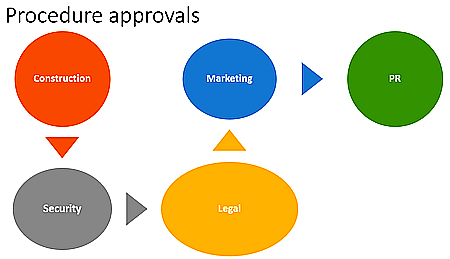
But sometimes one approver is not enough. In a new article in the kalmstrom.com Tips section, I suggest a solution for SharePoint document libraries where new files must be approved by several people.

SharePoint workflow
I use a SharePoint workflow to automate the multiple approval process, and the idea behind the workflow is that each approver is given a task to approve or reject the new document. When that task is completed, the workflow goes to next approver if the document is approved. If one of the approvers reject the document, the process is stopped.
SharePoint Designer icon
This workflow is a totally custom solution. I neither use the built-in approval status column nor any of the out-of-the-box workflows that Microsoft supplies.

The benefit of using a custom approval solution is that you have total control of the process. The downside (as you will see if you watch the video) is that it is rather complex and time-consuming to create. On the other hand I am using as much as five approvers. The workflow can of course be used for less people also.

Approvers in teams
Each approver in this example workflow belongs to a team, and all teams and approvers are stored in a SharePoint list. I use the team names in the workflow, so you don't have to modify the workflow if the person that approves or rejects documents must be replaced. The workflow will continue to run as soon as a new document has been added to the library.

Follow the process stages
The approval task for each approver is represented by a workflow stage. These stages are called "Waiting for [TEAM]", and if a team approves of the document, the workflow goes to the next stage.
Approval process

When I have created all the stages, I add two more stages: the Rejected stage and the All Approved stage. These stages both ends the workflow, but under different conditions. The Rejected stage is used when someone rejects the documents. The All Approved stage is used when all stakeholders have approved the document.

The benefit of working with stages in this way, is that everything is visible in the library. The approval status column shows "Waiting for [TEAM]", "Rejected by [TEAM]" or "All Approved", and in the document's version history you can see the whole process with details on when and by whom the document was approved or rejected.

Testing and error correction
The workflow I suggest is long and rather complicated, and when recording the demo below I made a few mistakes. To make the demo shorter I copied and pasted stages, and that also gave some errors.

I have chosen to include the testing and error fixing in the demo, as it can give valuable information to someone who tries the workflow.


Tips article
I have recorded this demo about approvals in multiple steps for my book SharePoint Workflows from Scratch. I have not finished writing it yet, but for now you can read the article in the kalmstrom.com Tips section. It has the demo and also a description of prerequisites and instructions on how to create the different stages.

By Peter Kalmström
CEO and Systems Designer
kalmstrom.com Business Solutions